Your Complete Guide to a Barn Door for Bathroom Projects
- oliverjames0609
- 3 days ago
- 16 min read
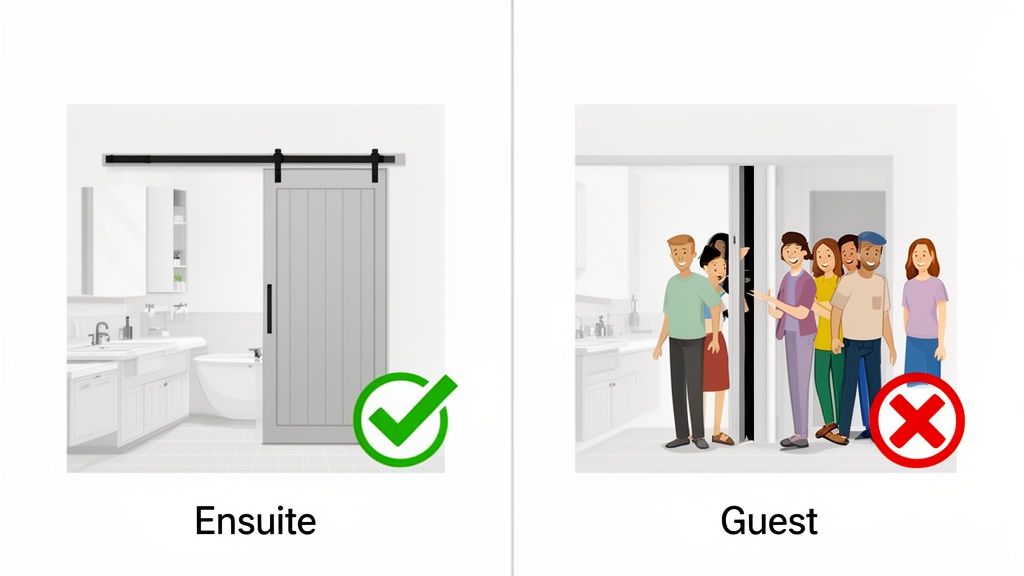
A barn door for a bathroom can be a stunning, space-saving statement piece. I've seen them work beautifully in ensuite or master bathrooms where total privacy isn't the absolute top priority. But when it comes to a high-traffic guest bathroom or a powder room off the main living area, you really have to pause and think it through. The potential for gaps and less-than-perfect sound insulation makes it a choice that hinges entirely on the bathroom's location and your comfort level with privacy.
Is a Barn Door Right for Your Bathroom?
The idea of putting a barn door on a bathroom is where high style meets hardcore practicality. It's a look that’s made its way from country farmhouses into sleek city apartments for a reason, but it's definitely not a universal solution. Before you fall in love with the aesthetic, let's get real about the day-to-day pros and cons for your home.
This isn't just a niche trend; it's a significant movement. The global market for interior barn doors was valued at a whopping USD 6.88 billion and is on track to hit USD 10.89 billion by 2032. Homeowners are the main drivers here, making up about 60% of the demand as they look for clever ways to handle tight spaces where a standard swinging door just won't work.
To help you decide, let's break it down into a quick comparison.
Barn Door vs. Traditional Door for Bathrooms at a Glance
Feature | Barn Door | Traditional Hinged Door |
|---|---|---|
Space Use | Excellent. Slides along the wall, freeing up floor space. | Poor. Requires a clear "swing zone" of 9-10 sq. ft. |
Privacy | Fair. Natural gaps can compromise sound and light sealing. | Excellent. Sits snugly in a jamb for a tight seal. |
Installation | Moderate. Requires a sturdy header and wall space to slide. | Straightforward. Mounts directly into the door frame. |
Aesthetics | High impact. Acts as a dynamic architectural feature. | Standard. Blends in, less of a style statement. |
Cost | Can be higher, depending on door and hardware quality. | Generally more budget-friendly and widely available. |
This table gives you the headlines, but the real decision comes down to how you live in your space.
The Upside: Gaining Space and Style
Let's talk about the wins. The biggest, most undeniable benefit of a barn door is the space you get back. A typical hinged door needs a clear path to swing open, eating up valuable real estate in the process.
Serious Space Saver: A sliding barn door glides parallel to the wall, instantly reclaiming that lost footage. This is a total game-changer in a cramped master bath or a tiny powder room. If you're wrestling with a small footprint, our guide to powder room perfection has more ideas on making the most of it.
A Design Powerhouse: A barn door is more than just a door; it’s a piece of kinetic art. It can bring in texture, a bold pop of color, or rustic charm, becoming a focal point that really defines the room's character.
The Downside: Let’s Be Honest About Privacy
Now for the reality check. The number one hesitation I hear from clients is about privacy, and it's a valid concern. By design, a barn door hangs from a track above the opening, which creates a gap of about half an inch to an inch between the door and the wall.
This gap is the weak link. It means light, sound, and yes, even odors, can travel more freely than they would with a traditional door sealed tightly in a frame.
This might be a non-issue for a master ensuite that only you and a partner use. But for a primary guest bathroom? It could lead to some awkward moments.
Before you get your heart set on a specific door, take a step back and look at the big picture. It’s smart to understand how to plan a bathroom renovation as a whole project. Thinking about noise, traffic flow, and who will use the space most often will help you make the right call and ensure your beautiful new door is also a practical one.
Choosing Materials That Can Handle Bathroom Humidity
A bathroom is one of the toughest spots in the house for any kind of woodwork. All that steam from hot showers creates a constant cycle of moisture and humidity that can make the wrong materials warp, swell, or even grow mold. When you're picking a barn door for your bathroom, you're not just choosing a style—you're making an investment in something that needs to last.
Let's walk through the best options that can actually stand up to the moisture, so your new door stays a beautiful feature instead of becoming a maintenance headache.

The Natural Choice: Solid Wood
There’s a classic, sturdy feel to solid wood that’s just hard to beat. But when it comes to a damp environment like a bathroom, not all woods are created equal. You’ll want to lean toward species known for their natural ability to fend off rot and humidity.
Cedar: This is my top recommendation. Cedar has natural oils that make it inherently resistant to moisture and decay. There's a reason it's used for saunas and outdoor siding!
Teak: Another fantastic choice. Teak is famous for its performance in wet conditions—it’s been used in boatbuilding for centuries for a reason. Its dense grain and high oil content just don't let water sink in.
White Oak: Don’t confuse it with red oak! While red oak has a porous grain, white oak’s is closed, making it far more water-resistant.
You can use softer woods like pine, but they are much more likely to warp over time. If you do go that route, your finishing process has to be absolutely perfect to give the wood a fighting chance.
Engineered and Composite Alternatives
If you're looking for stability or a more budget-friendly option, engineered materials are a great way to go. They just come with a few specific rules for bathroom use.
Medium-Density Fiberboard (MDF) is incredibly popular for interior doors because it gives you a perfectly smooth surface for painting. The problem? Standard MDF acts like a sponge around water. If you get even a tiny chip or scratch in the paint, moisture will seep in and the MDF will swell up and crumble. It’s irreversible.
If you’re set on the painted look of MDF, seek out moisture-resistant MDF (MR-MDF). It’s specifically engineered for humid spaces like bathrooms and laundry rooms. Even then, it needs a flawless, waterproof finish to be truly reliable.
Composites and PVC doors are another solid alternative. These synthetic materials are 100% waterproof. They will never warp, rot, or swell, no matter how steamy your bathroom gets. While you might not get the same authentic feel as solid wood, many modern designs are surprisingly stylish and offer total peace of mind.
Your First Line of Defense: The Finish
No matter which material you choose, the finish is what stands between your door and moisture damage. An unsealed or poorly finished door in a bathroom is just asking for trouble.
Think of the finish as a waterproof jacket. Your goal is to completely encapsulate the door, leaving absolutely no way for water vapor to get in.
For wood doors, I'd suggest a marine-grade varnish or a top-notch polyurethane coating. These finishes are designed for boats and outdoor decks, so you know they can handle a little steam. For painted doors (like MDF), start with a primer made for bathrooms and follow it with a high-quality, moisture-resistant paint, like a satin or semi-gloss acrylic latex.
A great finish also ties the whole room together. A beautifully sealed white oak door, for example, looks fantastic next to traditional wall treatments. For more ideas on creating a cohesive design, check out our guide to beadboard paneling in bathroom transformations.
Pro Tip: Seal All Six Sides
Here’s a piece of advice that separates the pros from the amateurs: you must seal all six sides of the door before you hang it. That means the front, back, top, bottom, and both vertical edges.
So many people forget the top and bottom edges because they aren’t visible. But that unsealed end grain is the most vulnerable part of the door—it acts like a straw, sucking moisture right into the core. This is the #1 cause of door swelling and warping.
Take the extra time to apply at least two good coats of your chosen sealer to every single surface. It's a small step that makes a world of difference for the long-term stability of your barn door for bathroom.
Getting Your Measurements Right for a Perfect Fit
Nothing brings a home project to a screeching halt faster than bad measurements. When it comes to installing a barn door, especially for a bathroom, getting the numbers right is everything. It’s not just about making the door fit; it’s about making it look intentional, function smoothly, and actually provide the privacy you need.
A classic rookie mistake is measuring the door to be the exact size of the opening. A barn door isn't meant to fit inside the frame like a traditional door; it needs to generously overlap it to avoid those awkward, light-leaking gaps.
Taking the time to measure carefully now will save you a world of headaches later and ensure a professional-looking result.
Calculating Your Door Slab Dimensions
First things first, let’s figure out the size of the door itself (often called the "door slab"). The whole point is to create a good overlap on all sides of the doorway trim to block sightlines and sound.
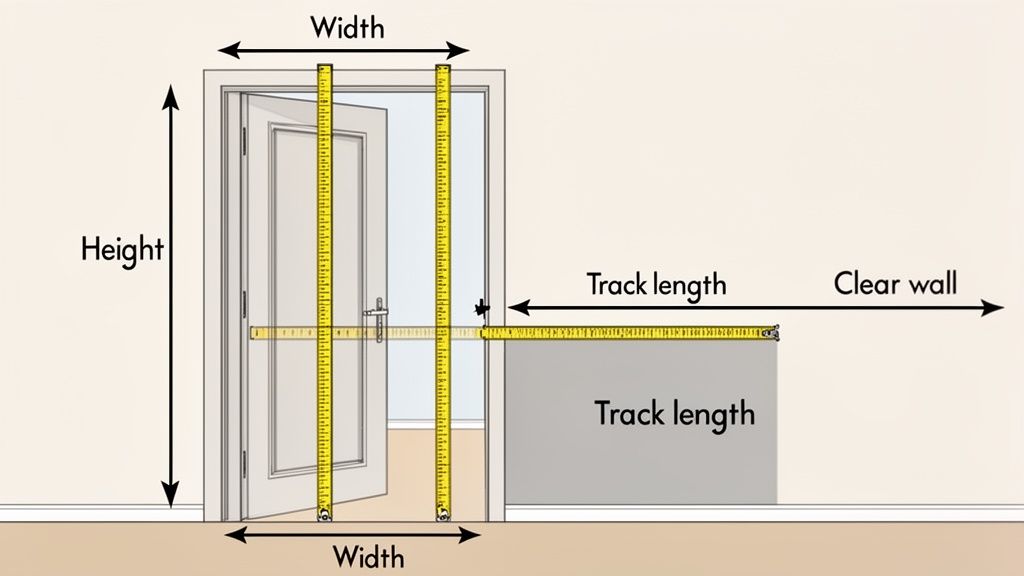
Get out your tape measure and record the full width of your doorway, measuring from the outer edge of the trim on one side to the outer edge on the other. Do the same for the height, from the floor to the very top of the trim.
For Width: Add 2 to 4 inches to the total width of your trimmed opening. So, if your doorway is 32 inches wide, you'll want a door that's at least 34 inches wide. This is non-negotiable for privacy.
For Height: Add 1 inch to the height of the trimmed opening. This makes sure the door hangs low enough to cover everything from top to bottom.
You'll find that certain sizes, like a 36x84 inch slab, are incredibly common. That's because a 36-inch width is a perfect match for the standard interior doorways found in most homes, which just goes to show how popular this whole concept has become.
Determining the Right Track Length
Once you know your door size, figuring out the track length is simple. You need a track that’s long enough for the door to slide completely out of the way of the opening.
The rule of thumb is easy: your track length should be double the width of your door slab. If you’ve settled on a 36-inch-wide door, you'll need a 72-inch (or 6-foot) track. Simple as that.
A Quick Tip from Experience: Always buy a track that is at least double your door width. A track that's too short is a project-killer—your door will permanently block part of the entrance, creating a bottleneck that you'll regret every time you walk through it.
The Most Important Measurement: Wall Space
This is the one that catches everyone off guard. You absolutely must have enough clear, unobstructed wall space right next to your doorway for the door to slide open. It's a deal-breaker if you don't.
Measure the wall area on the side where the door will hang when it's open. This patch of wall needs to be at least as wide as your door slab, with an extra inch or two for good measure.
Scan that wall space carefully for hidden obstacles:
Light switches
Electrical outlets
Thermostats
Wall art
Air vents
If anything is in the path, it has to be moved by a professional before you even think about drilling holes. It's also a good idea to run a level along the wall; a significant bow or warp can make the door rub or hang crooked.
If you're having trouble picturing it all, try using a room planner app to create a digital mock-up. It can help you visualize the final setup and confirm you have the clearance you need before you commit to buying anything.
Selecting Hardware for Privacy and Smooth Operation
The hardware you choose for a bathroom barn door is about so much more than just looks. It’s the engine of the whole setup. It determines how the door glides, how it stays put, and most critically, how private it actually feels. This is where you absolutely have to get the balance between form and function right.
We've seen a huge explosion in hardware options lately, and for good reason. Barn doors have become a go-to solution for turning cramped bathrooms into stylish, space-saving retreats. The global Barn Door Hardware Market even hit USD 2,040.02 million and is expected to climb to USD 2,613.08 million by 2031. This trend is largely driven by homeowners looking to bring that cozy farmhouse feel into city homes, where every square foot counts. A sliding door can free up 30% more floor space compared to a traditional hinged door. You can read more about this market growth on reanin.com.
Track Systems and Finishes
Your first big decision is the track system. This is the rail the door hangs from, so it has to be sturdy, perfectly level, and a good match for your bathroom's style.
The classic flat track with big, spoked wheels is what most people picture, and it’s perfect for that iconic farmhouse look. But the options don't stop there. You can find sleek, low-profile box tracks for a modern vibe or even polished stainless steel tubes for a super contemporary feel.
When it comes to finishes, you've got plenty of choices:
Matte Black: The undisputed champion for modern farmhouse and industrial designs. It’s incredibly versatile and great at hiding fingerprints.
Brushed Nickel or Stainless Steel: These give off a clean, modern energy that pairs beautifully with contemporary bathroom fixtures.
Oil-Rubbed Bronze: This is your go-to for a more traditional, rustic interior design styles, or Tuscan-inspired bathroom. It adds a wonderful, warm, aged character.
A good rule of thumb is to consider the other metals in the room—your faucet, towel racks, and lights. They don't need to be an exact match, but the overall feel should be cohesive. Your door hardware can be a fantastic opportunity to tie everything together.
Solving the Privacy Puzzle with the Right Lock
Okay, let's talk about the elephant in the room. A standard barn door kit doesn't come with a lock, and that gap between the door and the wall can leave you feeling a bit exposed. Luckily, this is a solved problem.
For a simple, classic solution, a hook-and-eye clasp is easy to install and does the job. It's not Fort Knox, but it sends a clear "occupied" signal.
If you want something a bit more polished, look into a teardrop latch. This is a slick two-piece lock where a small, swiveling "teardrop" on the door fits into a catch on the frame. It's subtle, effective, and looks custom. Another great choice is a mortised privacy bolt, which sits flush inside the door's edge for a completely clean look.
Key Takeaway: Don't just assume a standard hardware kit will handle privacy. You'll almost always need to buy a separate lock designed specifically for a sliding door to make sure everyone feels comfortable.
Upgrades for a Smoother, Quieter Experience
Beyond the basics of track and lock, a couple of small upgrades can make a world of difference in how your barn door for bathroom feels day-to-day.
Soft-Close Mechanisms are a non-negotiable for me. These little hydraulic dampers catch the door at the last few inches of travel and pull it gently shut. No more slamming. It's a small detail that feels incredibly luxurious, especially for those late-night or early-morning trips to the bathroom.
A Floor Guide is the other essential add-on. Since the door hangs from the top, the bottom can swing or rattle without something to hold it in line. A floor guide is a small piece of hardware that anchors to the floor or wall, fitting into a groove on the bottom of the door. This keeps the door running straight and true, preventing it from knocking against the baseboard and ensuring a smooth, quiet glide every single time.
To pull it all together, here's a look at the essential hardware components you’ll be working with.
Essential Barn Door Hardware for Your Bathroom Project
Hardware Component | Primary Function | Key Consideration for Bathrooms |
|---|---|---|
Track/Rail | Supports the full weight of the door and guides the rollers. | Must be long enough to allow the door to fully clear the opening. Ensure the material is moisture-resistant. |
Rollers/Hangers | Wheels that attach to the door and roll along the track. | Choose a style that matches your decor (spoked, straight). Ensure they have a high weight capacity. |
Door Stops | Placed at the ends of the track to prevent the door from rolling off. | Check that they are cushioned to prevent loud clanking when the door is opened or closed fully. |
Privacy Lock | Secures the door from the inside for privacy. | Essential for a bathroom. Options include teardrop latches, hook-and-eye clasps, or mortise bolts. |
Floor Guide | Keeps the bottom of the door stable and prevents it from swinging. | Absolutely critical for preventing swaying and noise. Choose a wall-mount option if you have heated floors. |
Handle/Pull | Allows for easy opening and closing of the door. | Select a style and finish that complements your other hardware and is comfortable to use. |
Soft-Close Kit | A hydraulic mechanism that gently pulls the door shut. | A "must-have" upgrade for preventing slams and adding a touch of luxury. |
Choosing these pieces thoughtfully will ensure your new barn door isn't just a design feature, but a functional, private, and durable part of your home.
A Practical Walkthrough of the Installation Process
Alright, this is where the fun really starts—taking all that planning and turning it into a finished project. Putting up a barn door for bathroom use is a totally doable DIY project, but I can't stress this enough: precision is everything. Even a tiny mistake can leave you with a door that scrapes, sways, or just won't stay put.
We're going to break it all down into simple, manageable steps to help you get a result you'll be proud of.
Before a single screw goes into the wall, let's talk about the foundation. You're hanging something heavy. That track needs to be anchored into something solid enough to support it, and trust me, drywall alone isn't going to cut it.
First Things First: The Header Board
Think of a header board as your installation's secret weapon. It’s just a simple piece of wood (a 1x4 or 1x6 works great) that you mount to the wall before you even touch the track. Why? Because the pre-drilled holes on your new track will almost never line up perfectly with the studs in your wall. The header board solves this problem instantly.
Grab a stud finder and mark the location of every stud above the doorway. Cut your header board to the same length as the track, then drive long screws (at least 3 inches) through the board and right into those studs.
This step is absolutely non-negotiable. It spreads the door's weight across several studs, preventing the track from eventually ripping out of the wall. Trying to hang a heavy door with just drywall anchors is asking for trouble.
Getting the Track Perfectly Level
With the header board securely in place, it’s time for the track. This is the moment of truth where your level becomes your best friend. If the track is even slightly off, you'll end up with a "ghost door" that constantly slides open or closed on its own.
Hold the track up against your new header board and place your level on top. Get it perfectly straight, then mark where you need to drill. Double-check everything, drill your pilot holes, and fasten the track securely with the provided hardware. Now is also a good time to slide the door stops onto the track, but don't tighten them down just yet.
This diagram shows how the main hardware pieces come together.
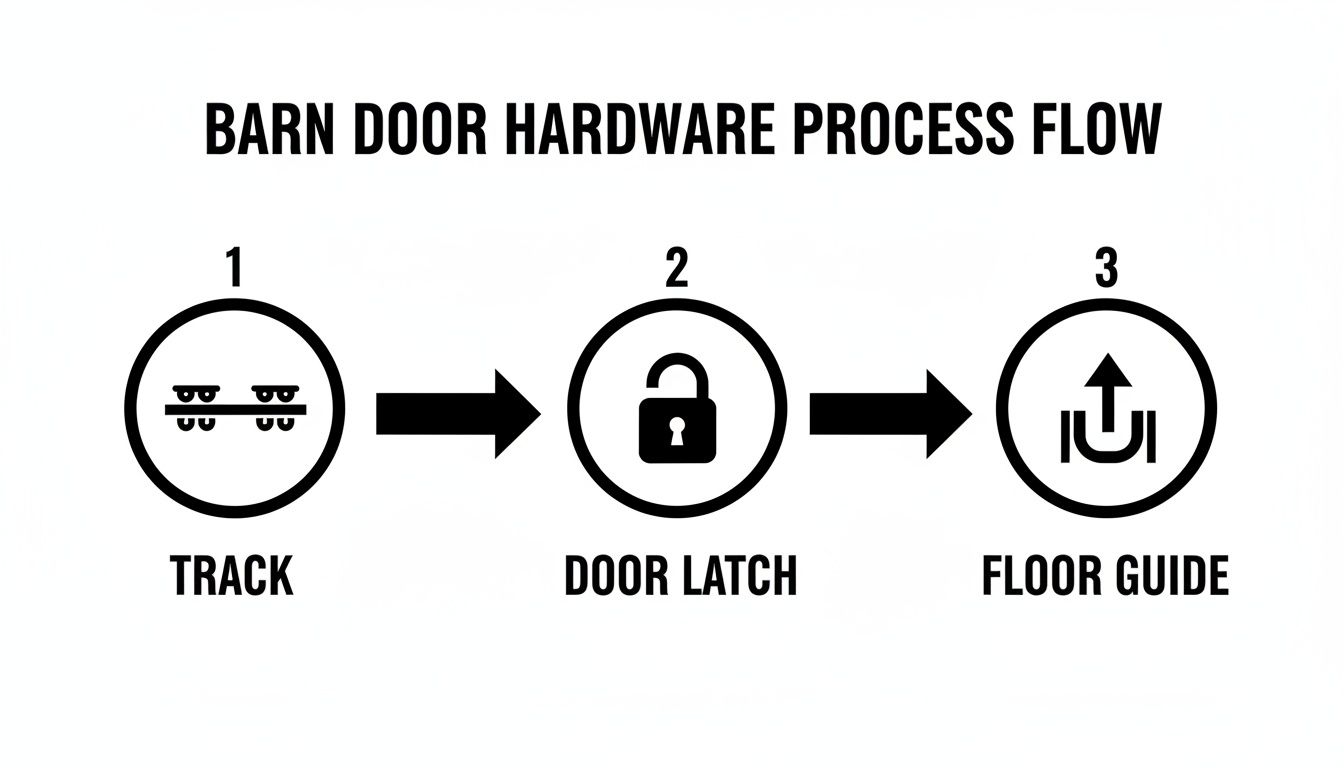
You can see how the track, lock, and floor guide work in concert to create a smooth and secure door system.
Hanging the Door and Adding the Finishing Touches
Here comes the most satisfying part. Start by attaching the roller hardware to the top of the door itself. Your kit will have specific instructions for placement—follow them to the letter. Getting this right ensures the door hangs at the perfect height, clearing the floor and covering the opening properly.
Now, grab a friend (you'll want help for this part) and carefully lift the door, setting the wheels onto the track. It feels great when it clicks into place! Give it a few gentle slides back and forth to make sure it glides smoothly.
With the door up, you can install your handle and privacy lock. These are usually pretty straightforward, but take a moment to figure out the most comfortable height before you drill any holes.
The Final Tweak: Adjusting Stops and the Floor Guide
Your door is hanging, but you're not quite done. Slide the door to the fully closed position. Now, move the door stop on that end of the track until it just touches the roller, and tighten it down firmly. Repeat this on the other side for the fully open position. This is what keeps your door from flying off the end of the track or banging into your wall.
The last crucial piece is the floor guide. This little part is an unsung hero—it keeps the bottom of the door from swinging back and forth. Most kits come with a guide that requires a small groove to be routed into the bottom edge of the door.
Tuck the guide on the floor so it's hidden just under the door's edge, mark your drill spots, and screw it in. This final touch is what gives your barn door for bathroom that stable, premium feel, and stops it from rattling every time you use it.
Got Questions About Bathroom Barn Doors?
It’s completely normal to have a few questions swirling around, even after digging into all the details. Putting a barn door on a bathroom is a big move, and you want to be sure you’ve thought of everything before you pull the trigger.
I've pulled together the most common questions I hear from homeowners. These are the practical, real-world concerns that always seem to come up when you start getting serious about the project.
How Can I Make It More Private?
This is, hands down, the biggest question on everyone’s mind. The secret to maximizing privacy is to stop thinking of it as just a slab of wood and start treating it as a complete system. You have to close the gaps from all sides.
First, choose a door that’s generously oversized for the opening. You’ll want a door that's at least two inches wider and one inch taller than the doorway, including the trim. This single step makes a huge difference in blocking sightlines from the sides.
From there, you can install simple additions like brush seals or weatherstripping around the doorframe and a sweep along the bottom. For a deeper dive into solutions for other common project questions, you can always check out our detailed FAQs page for more ideas.
The best setup for both privacy and sound? An oversized, solid-core door paired with good seals and a proper barn door lock. That combination gets you as close as possible to the privacy of a traditional swinging door.
Are Barn Doors a Pain to Keep Clean?
They’re actually pretty low-maintenance, as long as you chose the right materials and finish from the start. A door coated in a high-quality, moisture-resistant finish—like a good semi-gloss paint or even a marine-grade varnish—is a breeze to care for.
Most of the time, all you'll need is a quick wipe with a damp cloth to handle any smudges or water spots. The only real "chore" is to occasionally wipe down the track to clear out any dust, which keeps the rollers moving like they should.
What if I Don’t Have Much Wall Space?
This is the big one—the measurement you absolutely can't get wrong. You need a clear, unbroken section of wall right next to your doorway that is at least as wide as the door itself. Think of it as the door's parking spot when it's open.
Before you fall in love with a door, grab a tape measure and check that wall space. Be on the lookout for anything that could get in the door’s way:
Light switches
Outlets
Thermostats
Artwork or shelves
If that wall isn't completely clear, the installation is a no-go unless you're prepared to move those obstacles. In a super tight spot, you might consider a bypass system with two smaller doors, but that's a much more complex setup and not typical for a standard bathroom.
Ready to stop guessing and start seeing? With Decor8 AI, you can snap a photo of your bathroom and virtually test-drive different barn door styles. See for yourself how that rustic oak or sleek black door looks in your room before you commit.
Comments